Featured

My Experiences with Baking Pull-Apart Bread! ちぎりパン!

I recently succeeded in baking a delicious Japanese Pull-Apart Bread! I managed to make them look cute, too! Yay! With that said, let me first tell you what you need to bake this bread.

My Second Attempt

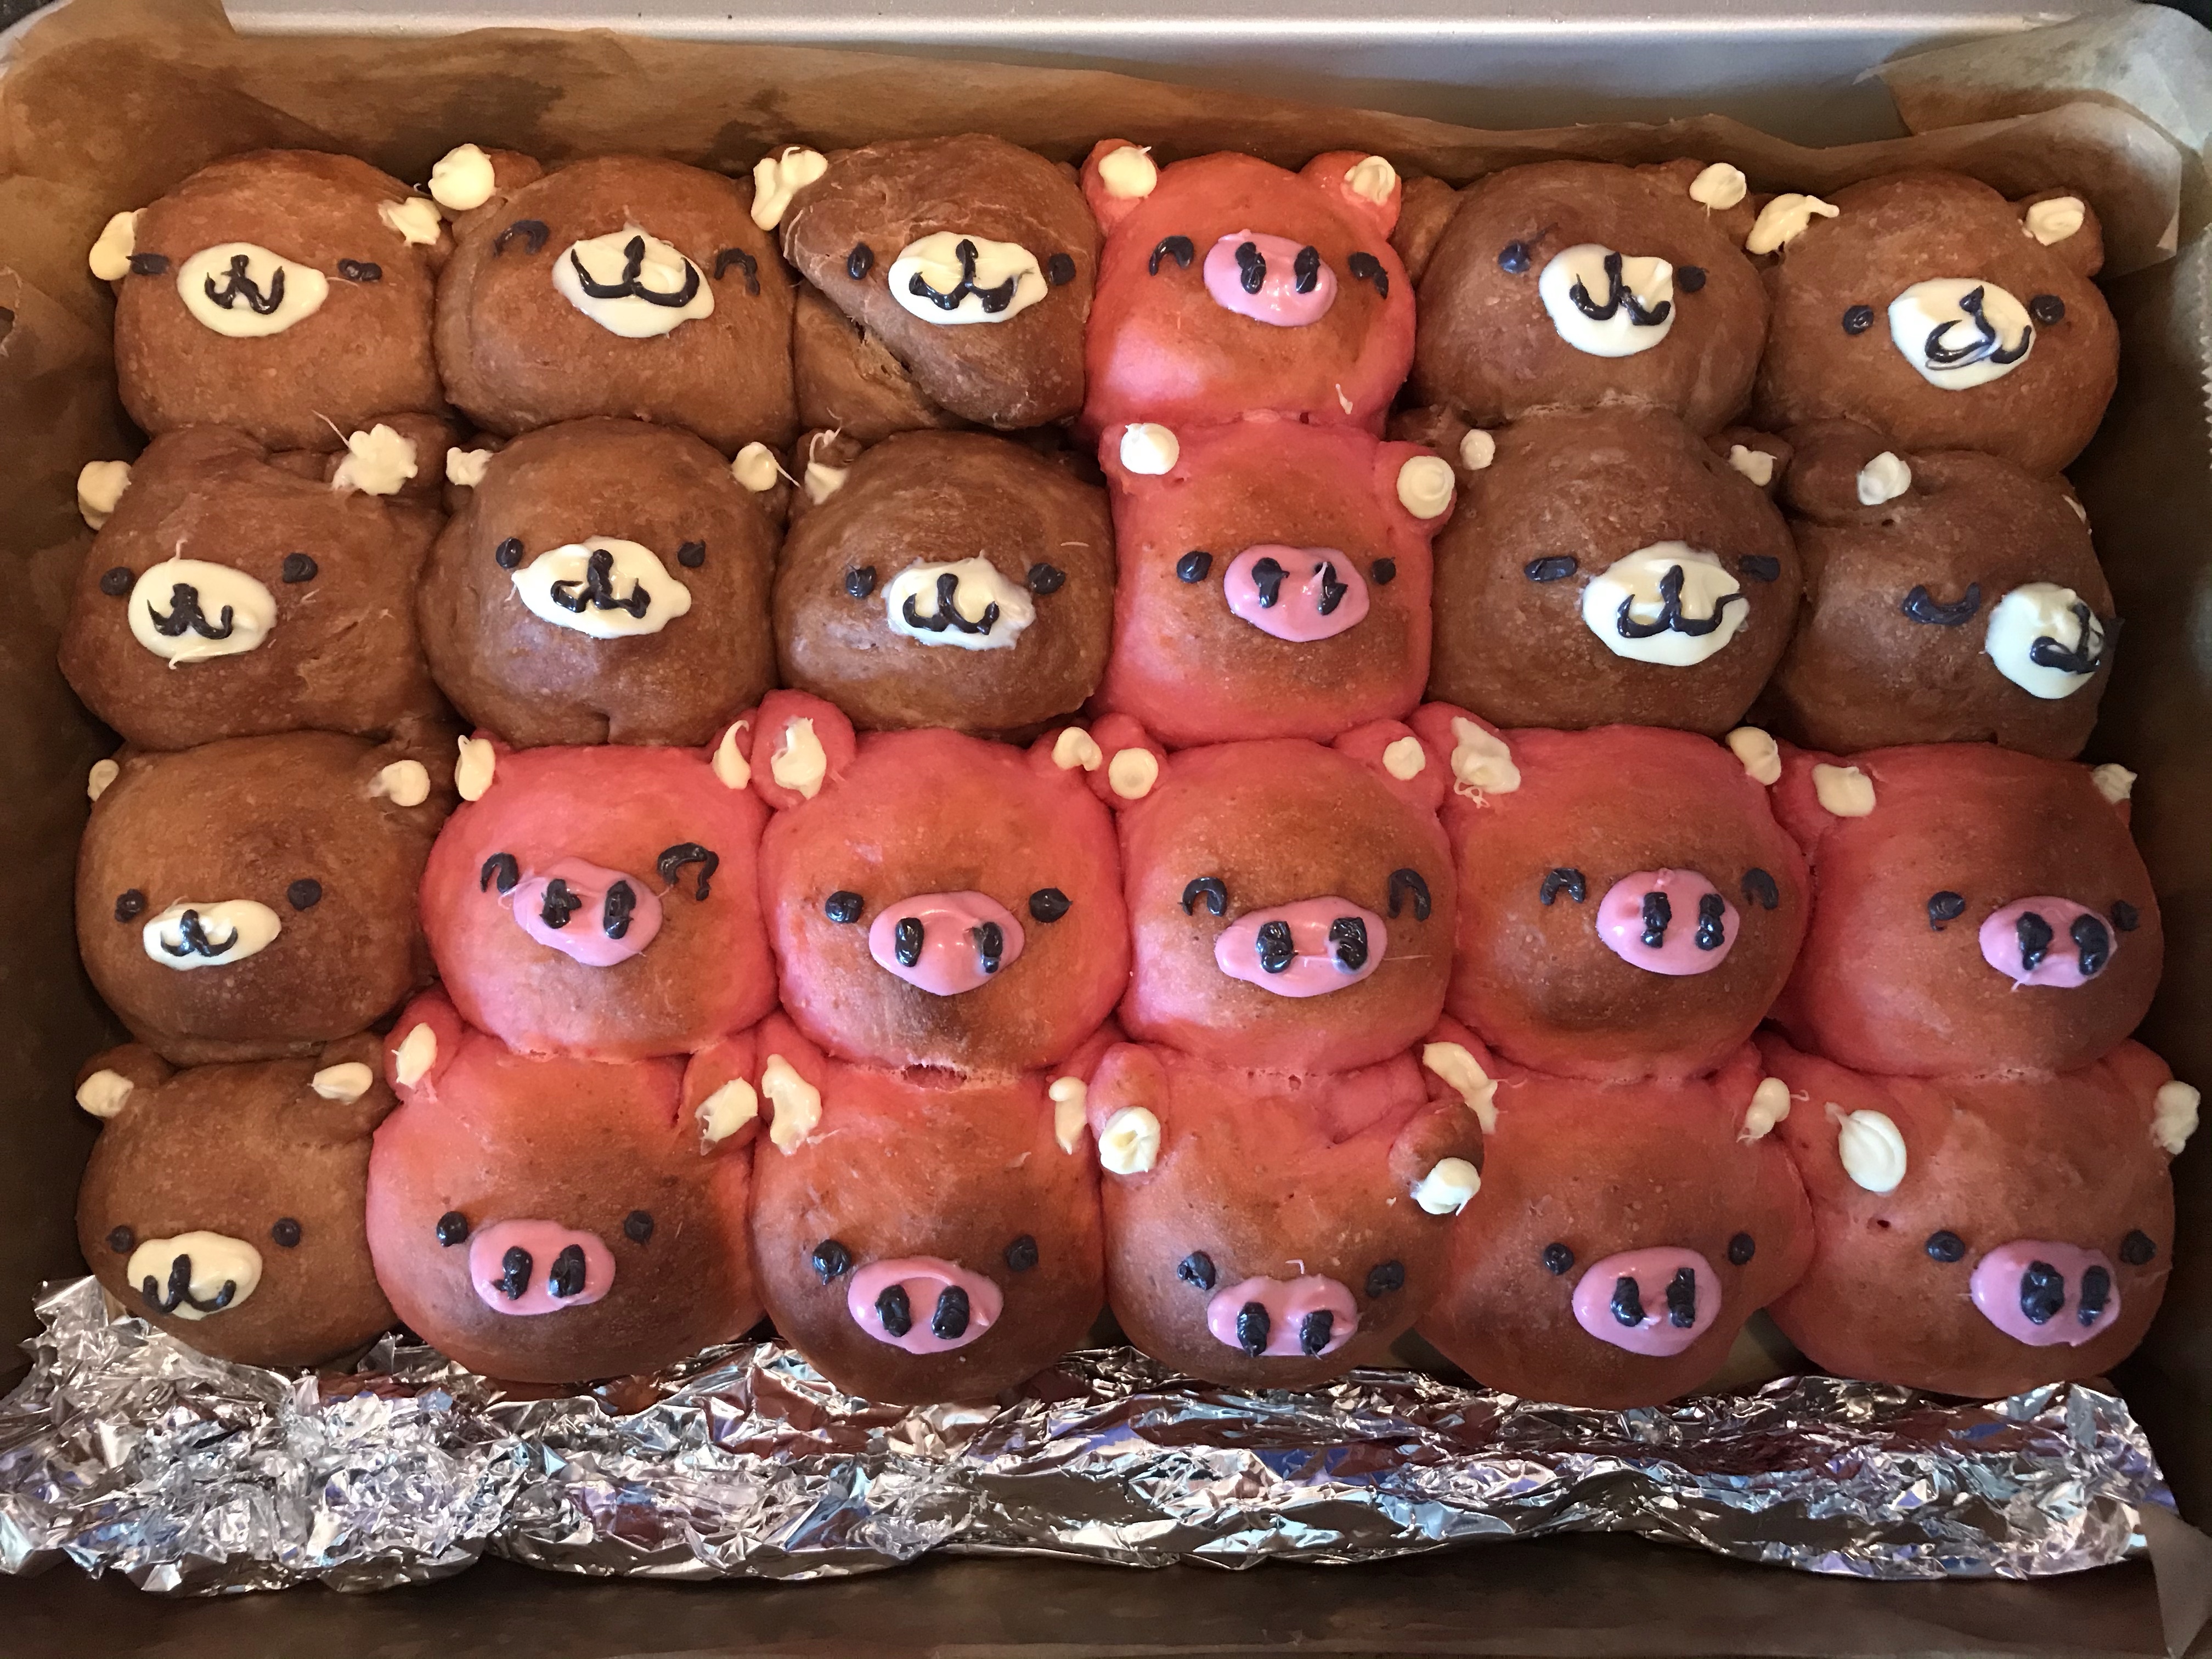
You need the RIGHT SIZED PAN! It frustrated me that most Baking Bloggers don’t tell you the dimension of the pans they use. The recipe I used calls for an 18cm x 18cm square pan. (I had to wade through 20 blogs and videos — or more! to find this vital information and it took me 3 days!) Anyway, the pan is pretty small but then so are the Japanese. They love eating bite sized food and in small proportions. Unlike the West where everything is large!

I didn’t have a metalic square pan of that shape. I only have a silicon that’s 20cm x 20cm. It’s way too big and the sides opens wide toward the top. You need a straight 90 degree sides. So, I ended up baking 2 each of different flavor (strawberry and chocolate), and using my rectangular pan that’s 30×20 cm. There were at least 5cm gap at the bottom, so I filled that up with aluminum foil.

First let me tell you why I had to fill up the empty spaces with aluminum foil: the bread didn’t rise enough!!! My entire apartment’s temperature is at 20 C. It still tasted really good but I want to learn and improve! For the yeast to work its magic, the room temperature has to be between 25-28 C. Luckily for me, I discovered a cheap-warming trick I was only able to fully put in action on my third try!

3rd Try: Almost there! Uh, oh!

I experienced 2 issues with my 3rd Try: (1.) I didn’t weigh the pieces evenly so I ended up with one open space (bottom, right corner) which I filled in with aluminum foil. I also had uneven sized extras with which I made raspberries and a mushroom shaped bread. (2.)It didn’t bake the entire pan, evenly. I saw the first bottom row was starting to brown so I removed it from the oven. Rookie Mistake! Next time I will cover it with aluminum foil to avoid browning. Well, the bottom row was fully baked but the rest were not!!! So minutes after removing from the oven, they deflated. I had to remove the bottom row and pop the pan back in the oven for another 10 mns of baking!

Raspberry and Mushroom shaped mini breads 😊

I would share you my recipe, but I am still trying to figure out the best way to bake it with my 20×30 cm pan!! Once I succeeded baking Chigiri Pan / Cute Pull-Apart Bread without any mistakes, I will for sure, share my recipe! For now, stay tuned!!!

I had to pop them back in the oven and redo the face decorations! (=´∀`)

De volgende keer zal ik geen fout maken!

今度は失敗無しを目指して頑張ります!

Next time I will aim to perfect it without any mistakes!

Featured

A Birthday, An Opportunity!

A week from now will be my son’s birthday. Since I will be busy arranging birthday bags for his classmates, I decided to bake his cake now. My son loves watching videos portraying people playing games on youtube. Recently he has taken a liking to the game, Among Us. If anyone here is internet savvy, Among Us is an online multiplayer, social deduction game published and developed by an American game studio, Innersloth. It has gotten so popular, that a lot of youtubers have uploaded videos after videos of them playing it. I have never played it, but it looks fun.

The point of the game is to find an alien imposter trying to kill every astronauts on the ship. There are two ways to win. One is to vote out the astronaut you suspect to be the alien imposter. Another way to win is to complete all tasks within the ship. At least, that’s how my son explained it. He loves the game so much, he asked me to bake him an Among Us themed cake.

As you all probably know by now, I like baking small cakes. If I could, I would bake larger cakes, and I have been given several suggestions on what to do with the cakes I baked. People have suggested that I donate the cakes to the hospitals, orphanages, etc. I would love to do that, seriously but I don’t have a car or a proper cake transporter to bring it to them. I would have to literally carry the cake on my lap, on a bus. It’s not a great idea. My in-laws are diabetic, so that’s not a good idea either. Which is why, the best thing to do is to bake less often and shrink my cakes.

For this cake, I used the 15 cm 5 tin layer cake pans by Wilton. The pan set came with cake recipes. I followed the Umber/Rainbow Cake recipes, but used Purple Yam flavoring as per my son’s request. I tried making Swiss Merengue Buttercream for the filling and coating, but since it has been a while that I have made them, I kept messing it up. I messed up twice. I think I used the wrong butter. Again. UGH! Having lost 2 hours, I gave up and went for the American Buttercream and added coconut flavors. For the final frosting, I added Dutch Black Cacao to a second batch of American Buttercream.

While baking the cakes, I first prepared the cake board. Using cheap fondant, I rolled a thin layer and placed it on the board. Using my stensil set, I stamped the words, “Happy Birthday” near the edge of the board and colored them in with green powdered food coloring, mixed with 70% alcohol. I wanted it to look a bit more professional, so I covered the side of the cake board with a red ribbon.

Since I need to make 2 astronauts, I set aside one of the cake layers and only stacked up four layers of cake. When all was set up, nice and dandy, I took a small bowl of 70% alcohol and added white powder food coloring. With a paint brush, I flicked white edible paint onto the Black Frosted Cake. And you get a nice, space-like environment.

Next I crumbled the cake I set aside and mushed it together with a bit of the left over buttercream. I rolled 2 balls of one measuring 80g and another, 36g. I molded the 80g cake ball into a full body of the Among Us astronaut. The 36g is only the bottom half. I took out a packet of fondant, colored them with food coloring, rolled them flat before covering the molds. I added details to the astronauts according to the images above before propping them up on top of the cake. I made a nice little party hat for the green astronaut and glued it on its head with edible glue.

I wanted blood on the cake, so I melted down white chocolate au bain marie style, added whole cream and red food coloring. Again, I had to do this 3x! The first two tries were terrible because I forgot which food coloring worked best with chocolates. Pro Gel sure wasn’t it! I stuck with Brand New Cake Food Coloring. To complete the look, I placed white pearls on the bottom and added stars and colored candy balls on the side of the cake. And viola! It’s done!

Ghost Cake with Flowers on Her Hair

www.facebook.com/104262514671687/posts/307978370966766/

For this ghost cake I used several methods. It’s 7 layers of Chocolate Carving Cake with Swiss Chocolate Buttercream filling and chocolate chips, coated with Korean Buttercream before covering with white, vanilla fondant.

The flowers are piped using Korean Buttercream which I flavored with vanilla essence.

My husband said and I quote, “This is the best tasting cake you have ever made!”

His nitpicking and over 2 years of practicing and self-learning have paid off at last!

♥️💜🥰

Online Recipes, the US Imperial System, and the Online Conversions

Hi! As you all know I am a Hobby Baker. I pretty much taught myself while watching tutorials on youtube. I wouldn’t exactly call it “free” since we’re still paying for the electricity, internet, and rent for me to be able to watch anything online—but, I digress.

Most of the stuff I learned to bake, I got from online recipes and I cannot stress enough how painstakingly annoying it is when every recipe I have taken a liking to, provides ingredients using the US Imperial System of Measurement!!! Let me tell you: NEVER TRY TO CONVERT FROM IMPERIAL to METRIC System online!!! No, no.

I learned the hard way.

When I used online conversion to change US Imperial Units to Metric Units, my profiteroles came out looking like cheap bread even after final attempt to salvage the batter!!!

The best way to do it is to get a measuring cup and a digital scale. Measure how much a cup weighs per ingredient on a scale and write them down! If you rely too much on online measurements and charts, you will most certainly mess up your bakes!

In this example, the recipe calls for 1 cup of water and 1 cup of flour! When I looked up the conversion online, it said 237ml and 136g respectively!!!

I was super naive, I trusted the internet and— you guessed it! I messed up my bake!!! I was baking the Choux Shells or Profiteroles!!! I realized my mistake and started all over again. This time I decided to measure both the water and the flour using my most trusted digital scale for future and personal reference!!

When I measured a cup of water on a digital scale, I got a completely different measurement!!! 1 cup of water is only 123ml!!! Not 237ml!!!
While 1 cup of all-purpose flour is only 105g!!!!

With these new measurements, I did my Choux Shells all over again and this time, they look lovely! *sigh of relief* I must include that the original recipe called for 4 large eggs!!! Since it made the batter super runny and impossible to pipe, I only added 3 eggs! This is now my own recipe since I made alterations!

Second try with proper measurements!

Well, I hope you learned something from my experience. Do not let this discourage you! If you love baking as much as I do, just keep on baking!!!

My Homemade Choux With Vanilla Custard! Deliciously addicting!

Happy Easter To All!!!

www.instagram.com/p/CNKvdJwnyNi/

I still haven’t posted my Pumpkin Pie recipe! Oops! So many things are happening, that I couldn’t keep my pace.

I was expecting another week of school for my kids, but due to a sudden spike in a number of children catching COVID-19 without any dire symptoms, schools were closed early and Spring Vacation got a 2 week extension!

I will do my best and post as often as possible, despite having to look after two very different kids who often clash with each other much more than they can get along!!!

I am actually in awe of my ability to bake and decorate cupcakes while handling my kids!!! I hope you like my decorations!

Happy Easter!

Fun with Rice Krispies

Rice Krispies is one of the easiest and the earliest recipes children learn how to make. You just need 3 basic ingredients and you can shape, cut, and add as much or little decorations and even flavors to them.


Last year I tried adding peppermint to the rice crispies and ever since, my son would always ask for Peppermint Flavored Rice Crispies. Today, I wanted to try just a plain old mint flavor and added some chocolate chips to the rice crispies. They taste lovely!

Many of our kitchen wares are small and we don’t really eat that much. Again, I had to decrease the amount of ingredients in the common recipes for my family. That’s okay, less is more after all! For this recipe, I used clarifying butter and jumbo camping marshmallows (which I cut into smaller pieces for smoother and faster melting). I also used an 18.5x25cm pan, but I did remove some of the rice crispies, rolled them flat, and made heart-shaped cut outs.

Rice Krispies Recipe

  • INGREDIENTS
    • 21.25g butter
    • 159g Marshmallows
    • 150g Rice Krispie Cereal
    • 1 tsp mint paste
    • 30g of mini chocolate chips
  • INSTRUCTIONS:
    1. Get a 18.5x25cm size (metal or glass) pan and butter the bottom and sides with melted butter.
    2. In a large pot, melt butter with low-medium heat.
    3. Once the butter is melted, add the marshmallows. Make sure the marshmallows are completely melted. Then add the flavor of your choice: vanilla, strawberry, mint, etc.
    4. Add the rice krispies in 3 parts to get a smooth and even blend.
    5. Transfer into the prepared pan, use a spatula and baking paper to flatten the top. Let it cool for up to 15 to 30 mns in the fridge.
    6. Once cooled, you may cut your rice krispies in any shape you want using a cookie cutter. You can add and decorate your rice krispies with whatever you desire:
      • chocolate chips, drizzle melted chocolate over the top, sprinkles, etc.
    7. Have fun decorating and enjoy!
Design a site like this with WordPress.com
Get started